1. vgpu 安装 应该
apt update && apt install -y git curl wget
git clone https://github.com/anomixer/proxmox-vgpu-installer.git
cd proxmox-vgpu-installer
chmod +x proxmox-installer.sh
bash proxmox-installer.sh
2. 检查 nvidia 模块加载
lsmod | grep nvidia
3. 检查 vGPU 服务状态
systemctl status nvidia-vgpud
systemctl status nvidia-vgpu-mgr
4. 查看识别到的虚拟 GPU 配置文件
mdevctl types5. 一次性复制全部 iso 到PVE 可选ISO 关键是目标目录
rsync -avh /mnt/usb/*.iso /var/lib/vz/template/iso/参考命令:
# apt-get install -y proxmox-kernel-7.0.2-6-pve [+] Found host driver:
https://alist.homelabproject.cc/d/foxipan/vGPU/20.2/NVIDIA-GRID-Linux-KVM-595.91.04-595.91.07-596.86/Host_Drivers/NVIDIA-Linux-x86_64-595.91.04-vgpu-kvm.run
https://alist.homelabproject.cc/d/foxipan/vGPU/20.2/NVIDIA-GRID-Linux-KVM-595.91.04-595.91.07-596.86/Guest_Drivers/NVIDIA-Linux-x86_64-595.91.07-grid.run
https://alist.homelabproject.cc/d/foxipan/vGPU/20.2/NVIDIA-GRID-Linux-KVM-595.91.04-595.91.07-596.86/Guest_Drivers/596.86_grid_win10_win11_server2022_server_2025_dch_64bit_international.exe

https://alist.homelabproject.cc/d/foxipan/vGPU/19.5/NVIDIA-GRID-Linux-KVM-580.159.01-580.159.03-582.53/Host_Drivers/NVIDIA-Linux-x86_64-580.159.01-vgpu-kvm.run
https://alist.homelabproject.cc/d/foxipan/vGPU/19.5/NVIDIA-GRID-Linux-KVM-580.159.01-580.159.03-582.53/Guest_Drivers/NVIDIA-Linux-x86_64-580.159.03-grid.run
https://alist.homelabproject.cc/d/foxipan/vGPU/19.5/NVIDIA-GRID-Linux-KVM-580.159.01-580.159.03-582.53/Guest_Drivers/582.53_grid_win10_win11_server2022_server_2025_dch_64bit_international.exe
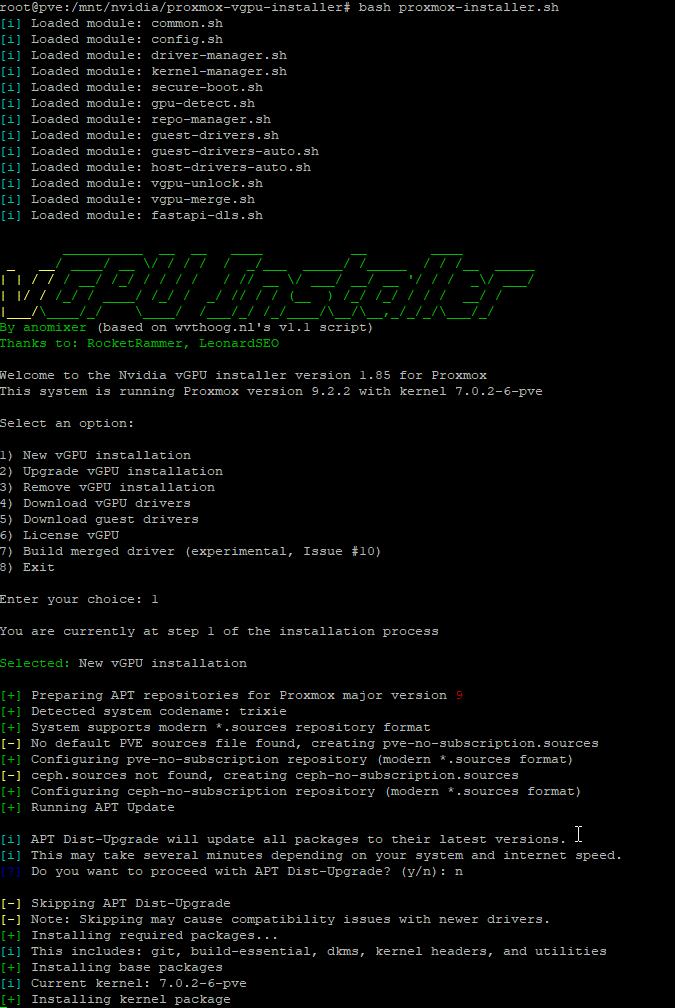 参考:
参考:https://github.com/anomixer/proxmox-vgpu-installer以下摘自 https://blog.margrop.net/post/proxmox-ve-daily-maintain/
=====================================================
Proxmox VE 9.0 日常维护,去掉未订阅的提示,和设置国内源——2025年8月6日更新
本文整理了 PVE 6.x / 7.x / 8.x / 9.x 的高频维护操作,并修正了旧版内容里的重复段落和明显错误。
建议先执行一次版本确认,再按对应版本操作,不要混用不同版本的源配置。
pveversion
1. 日常维护(通用)
1.1 清理未使用内核(pvekclean)
git clone https://github.com/jordanhillis/pvekclean.git /opt/pvekclean
cd /opt/pvekclean
chmod +x pvekclean.sh
./pvekclean.sh
1.2 系统更新与常用工具安装
apt-get update
apt-get install -y vim lrzsz unzip net-tools curl screen tmux uuid-runtime git
apt-get dist-upgrade -y
apt-get autoremove --purge -y
2. 去掉未订阅提示(可选)
提示:这是 UI 层修改,PVE 升级后可能被覆盖;建议仅用于个人实验环境。
cp /usr/share/javascript/proxmox-widget-toolkit/proxmoxlib.js \
   /usr/share/javascript/proxmox-widget-toolkit/proxmoxlib.js.bak.$(date +%F-%H%M%S)sed -i "s/data.status !== 'Active'/false/g" /usr/share/javascript/proxmox-widget-toolkit/proxmoxlib.js
systemctl restart pveproxy
3. PVE UI 增强(硬件概要信息)
官网地址:https://bbs.x86pi.cn/thread?topicId=20
# 稳定版wget -q -O /root/pve_source.tar.gz \
'https://bbs.x86pi.cn/file/topic/2023-11-28/file/01ac88d7d2b840cb88c15cb5e19d4305b2.gz' \
&& tar zxvf /root/pve_source.tar.gz \
&& /root/pve_source
脚本界面里按提示选择对应版本(例如 7 -> 1 -> o)。
4. 设置国内源(按版本选择,不要混用)
4.1 PVE 6.x(Debian buster)
cat > /etc/apt/sources.list <<'EOF_INNER'
deb https://mirrors.huaweicloud.com/debian/ buster main non-free contrib
deb-src https://mirrors.huaweicloud.com/debian/ buster main non-free contrib
deb https://mirrors.huaweicloud.com/debian-security/ buster/updates main non-free contrib
deb-src https://mirrors.huaweicloud.com/debian-security/ buster/updates main non-free contrib
deb https://mirrors.huaweicloud.com/debian/ buster-updates main non-free contrib
deb-src https://mirrors.huaweicloud.com/debian/ buster-updates main non-free contrib
deb https://mirrors.huaweicloud.com/debian/ buster-backports main non-free contrib
deb-src https://mirrors.huaweicloud.com/debian/ buster-backports main non-free contrib
EOF_INNER
rm -f /etc/apt/sources.list.d/pve-enterprise.list
curl -fsSL https://mirrors.ustc.edu.cn/proxmox/debian/proxmox-ve-release-6.x.gpg -o /etc/apt/trusted.gpg.d/proxmox-ve-release-6.x.gpg
echo "deb https://mirrors.ustc.edu.cn/proxmox/debian/pve buster pve-no-subscription" > /etc/apt/sources.list.d/pve-install-repo.list
apt-get update && apt-get dist-upgrade -y
4.2 PVE 7.x(Debian bullseye)
cat > /etc/apt/sources.list <<'EOF_INNER'
deb https://mirrors.huaweicloud.com/debian/ bullseye main non-free contrib
deb-src https://mirrors.huaweicloud.com/debian/ bullseye main non-free contrib
deb https://mirrors.huaweicloud.com/debian-security/ bullseye-security main
deb-src https://mirrors.huaweicloud.com/debian-security/ bullseye-security main
deb https://mirrors.huaweicloud.com/debian/ bullseye-updates main non-free contrib
deb-src https://mirrors.huaweicloud.com/debian/ bullseye-updates main non-free contrib
deb https://mirrors.huaweicloud.com/debian/ bullseye-backports main non-free contrib
deb-src https://mirrors.huaweicloud.com/debian/ bullseye-backports main non-free contrib
EOF_INNER
rm -f /etc/apt/sources.list.d/pve-enterprise.list
curl -fsSL https://mirrors.ustc.edu.cn/proxmox/debian/proxmox-release-bullseye.gpg -o /etc/apt/trusted.gpg.d/proxmox-release-bullseye.gpg
echo "deb https://mirrors.ustc.edu.cn/proxmox/debian/pve bullseye pve-no-subscription" > /etc/apt/sources.list.d/pve-install-repo.list
apt-get update && apt-get dist-upgrade -y
4.3 PVE 8.x(Debian bookworm)
cat > /etc/apt/sources.list <<'EOF_INNER'
deb https://mirrors.huaweicloud.com/debian/ bookworm main non-free contrib
deb-src https://mirrors.huaweicloud.com/debian/ bookworm main non-free contrib
deb https://mirrors.huaweicloud.com/debian-security/ bookworm-security main
deb-src https://mirrors.huaweicloud.com/debian-security/ bookworm-security main
deb https://mirrors.huaweicloud.com/debian/ bookworm-updates main non-free contrib
deb-src https://mirrors.huaweicloud.com/debian/ bookworm-updates main non-free contrib
deb https://mirrors.huaweicloud.com/debian/ bookworm-backports main non-free contrib
deb-src https://mirrors.huaweicloud.com/debian/ bookworm-backports main non-free contrib
EOF_INNER
rm -f /etc/apt/sources.list.d/pve-enterprise.list
curl -fsSL https://mirrors.ustc.edu.cn/proxmox/debian/proxmox-release-bookworm.gpg -o /etc/apt/trusted.gpg.d/proxmox-release-bookworm.gpg
echo "deb https://mirrors.ustc.edu.cn/proxmox/debian/pve bookworm pve-no-subscription" > /etc/apt/sources.list.d/pve-install-repo.list
apt-get update && apt-get dist-upgrade -y
4.4 PVE 9.x(Debian trixie)
cat > /etc/apt/sources.list <<'EOF_INNER'
deb https://mirrors.huaweicloud.com/debian/ trixie main non-free contrib
deb-src https://mirrors.huaweicloud.com/debian/ trixie main non-free contrib
deb https://mirrors.huaweicloud.com/debian-security/ trixie-security main
deb-src https://mirrors.huaweicloud.com/debian-security/ trixie-security main
deb https://mirrors.huaweicloud.com/debian/ trixie-updates main non-free contrib
deb-src https://mirrors.huaweicloud.com/debian/ trixie-updates main non-free contrib
deb https://mirrors.huaweicloud.com/debian/ trixie-backports main non-free contrib
deb-src https://mirrors.huaweicloud.com/debian/ trixie-backports main non-free contrib
EOF_INNER
rm -f /etc/apt/sources.list.d/pve-enterprise.list
curl -fsSL https://mirrors.ustc.edu.cn/proxmox/debian/proxmox-release-trixie.gpg -o /etc/apt/trusted.gpg.d/proxmox-release-trixie.gpg
echo "deb https://mirrors.ustc.edu.cn/proxmox/debian/pve trixie pve-no-subscription" > /etc/apt/sources.list.d/pve-install-repo.list
apt-get update && apt-get dist-upgrade -y
5. 网络与 DNS
5.1 DNS 无法解析时(临时修复)
cp /etc/resolv.conf /etc/resolv.conf.bak.$(date +%F-%H%M%S)cat > /etc/resolv.conf <<'EOF_INNER'
nameserver 223.5.5.5
nameserver 223.6.6.6
EOF_INNER
systemctl restart networking
说明:如果系统有 NetworkManager 或 DHCP 客户端接管,/etc/resolv.conf 可能会被再次覆盖。
5.2 命令行修改 PVE 默认管理 IP
vim /etc/network/interfaces
典型配置如下:
auto lo
iface lo inet loopback

iface enp2s0 inet manual

auto vmbr0
iface vmbr0 inet static
    address 192.168.1.2
    netmask 255.255.255.0
    gateway 192.168.1.1
    bridge_ports enp2s0
    bridge_stp off
    bridge_fd 0
通常只需要修改 address、netmask、gateway。修改后可执行:
ifreload -a
6. 时间同步(NTP)
6.1 PVE 6.x(timesyncd)
cat > /etc/systemd/timesyncd.conf <<'EOF_INNER'
[Time]
NTP=ntp1.aliyun.com ntp2.aliyun.com ntp3.aliyun.com ntp4.aliyun.com ntp5.aliyun.com ntp6.aliyun.com ntp7.aliyun.com
EOF_INNER
timedatectl set-ntp true
timedatectl status
6.2 PVE 7.x / 8.x / 9.x(chrony)
cat >> /etc/chrony/chrony.conf <<'EOF_INNER'
# Aliyun NTP
server ntp1.aliyun.com minpoll 4 maxpoll 10 iburst
server ntp2.aliyun.com minpoll 4 maxpoll 10 iburst
server ntp3.aliyun.com minpoll 4 maxpoll 10 iburst
server ntp4.aliyun.com minpoll 4 maxpoll 10 iburst
server ntp5.aliyun.com minpoll 4 maxpoll 10 iburst
server ntp6.aliyun.com minpoll 4 maxpoll 10 iburst
server ntp7.aliyun.com minpoll 4 maxpoll 10 iburst
EOF_INNER
systemctl restart chrony
chronyc sources -v
7. 常见报错处理
7.1 E: Sub-process /usr/bin/dpkg returned an error code
dpkg --configure -a
apt-get update --fix-missing
apt-get -f install
apt-get autoremove --purge -y
apt-get clean
7.2 升级时提示要移除 proxmox-ve 元包
先检查要被移除的包,再删除旧内核:
dpkg --list | grep -E 'pve-kernel|linux-image|linux-headers'proxmox-boot-tool kernel list

# 示例:替换为你实际旧内核版本apt-get --purge remove pve-kernel-6.2.16-15-pve
update-grub
7.3 locale: Cannot set LC_CTYPE ...
echo 'en_US.UTF-8 UTF-8' >> /etc/locale.gen
locale-gen
update-locale LANG=en_US.UTF-8 LC_ALL=en_US.UTF-8
8. 参考资料
- Proxmox 官方时间同步文档:https://pve.proxmox.com/wiki/Time_Synchronization
- 中科大 Proxmox 源帮助:https://mirrors.ustc.edu.cn/help/proxmox.html
- 阿里云 Debian 镜像:https://developer.aliyun.com/mirror/debian
- Proxmox 论坛(升级移除元包问题):https://forum.proxmox.com/threads/apt-get-dist-upgrade-wants-to-remove-proxmox-ve-pve-firmware.39360/